Salted Caramel Mocha Fudge

Christmas baking is in full swing around here and I don’t know about you, but I can’t let the season pass without making some fudge! In the past I’ve made plain chocolate and peanut butter fudges for our annual family goodie gifts, but I wanted something a little fancier this year. Enter this little beauty of a recipe. I’m a big fan of the salty/sweet combination lately and I looooove the Starbucks drink of similar flavors. This fudge was no disappointment! Super rich chocolate, a sweet drizzle of caramel and a little sprinkle of sea salt. Are you drooling yet? Bonus- this recipe makes a HUGE batch, so you’ll have plenty to share… If you really want to share. 😉

Ingredients:

Makes (1) 15 in x 10 in x 1 in pan, or ~ 5 pounds

  • 4 cups granulated sugar 
  • 1 cup milk
  • 1 cup (2 sticks) unsalted butter 
  • 1 teaspoon vanilla
  • 1 tablespoon espresso powder
  • 1 bag milk chocolate chips
  • 1 bag semisweet chocolate chips
  • 2 oz unsweetened baking chocolate 
  • 25 (almost 1 bag) marshmallows 
  • 1 bag (2 cups) soft caramels
  • 2 tablespoons heavy cream
  • Sea salt, for sprinkling

Directions:

First, line your pan with wax paper- enough that some hangs over the sides. In a medium sauce pan, combine the sugar, milk, butter, vanilla, and espresso powder over medium-high heat.

 Stir continuously and bring to a boil. Once boiling, lower heat slightly and keep at a rolling boil for about 2 minutes (keep stirring!).  

 
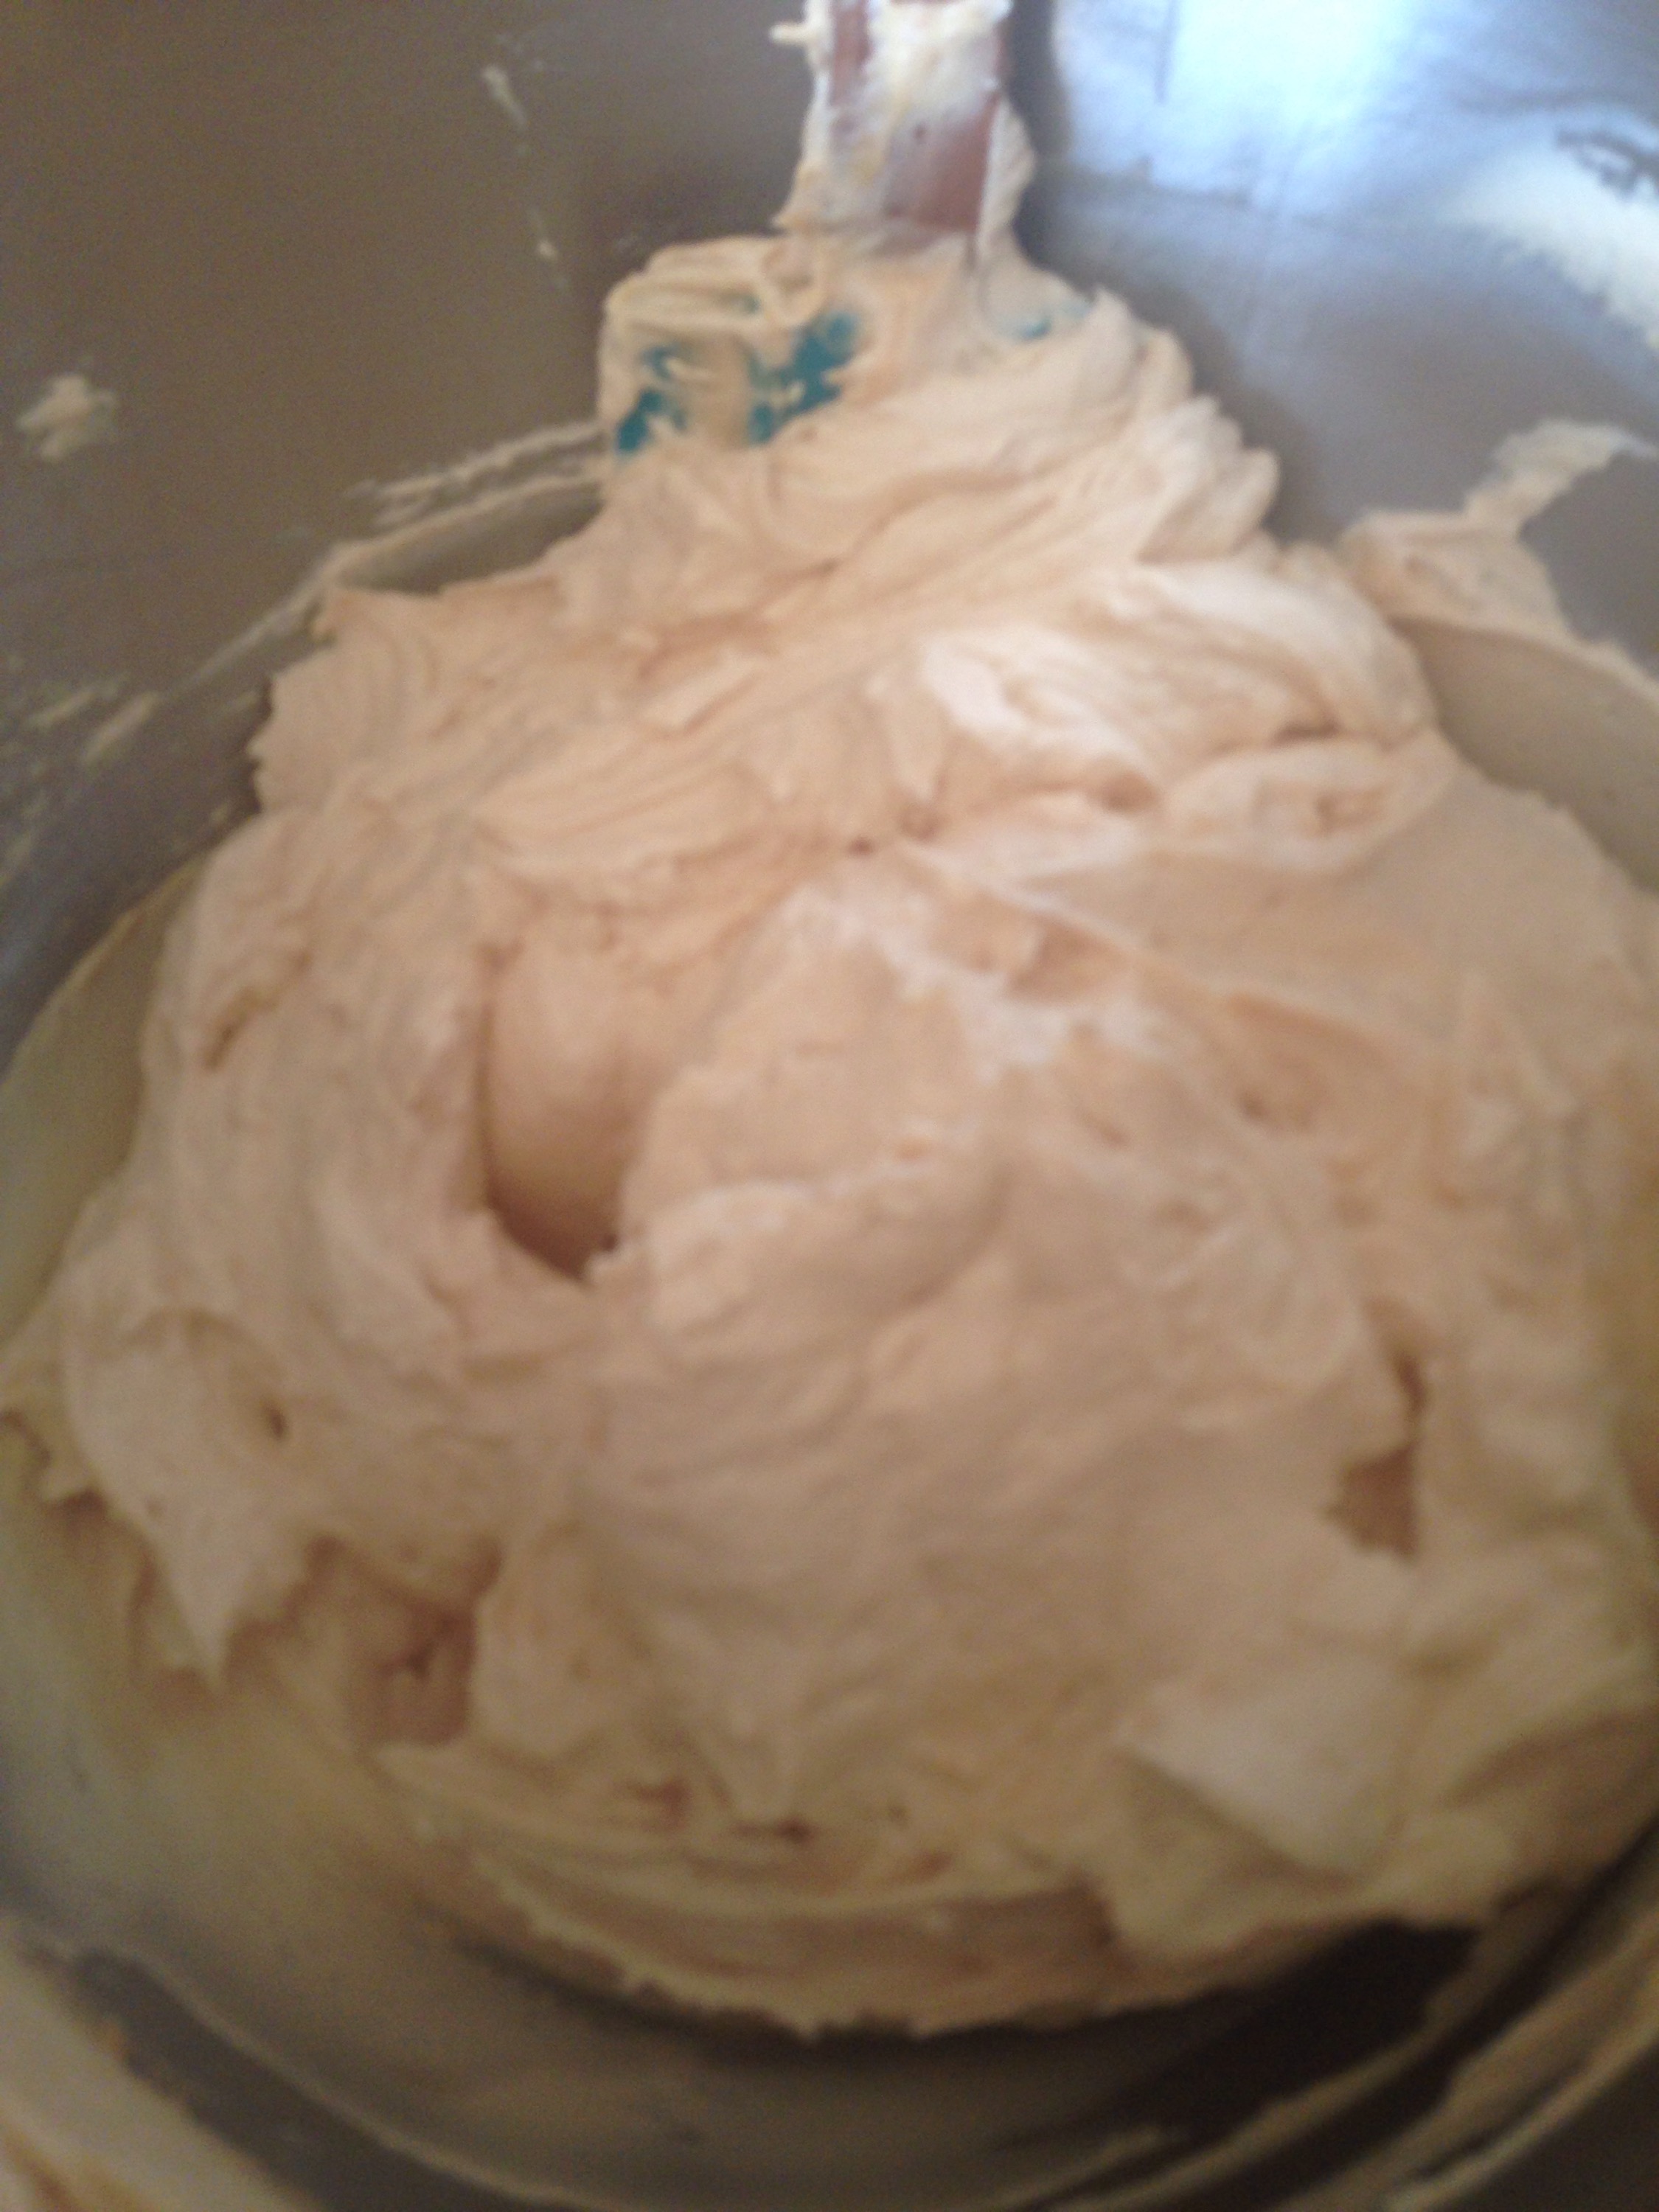
In the bowl of your stand mixer, combine all of the chocolate and the marshmallows. 

  Pour the boiling hot mixture over the top… 

 Then beat with the whisk attachment for 2-3 minutes. You’ll have to stop and scrape the bowl a couple of times- it’s pretty sticky!  

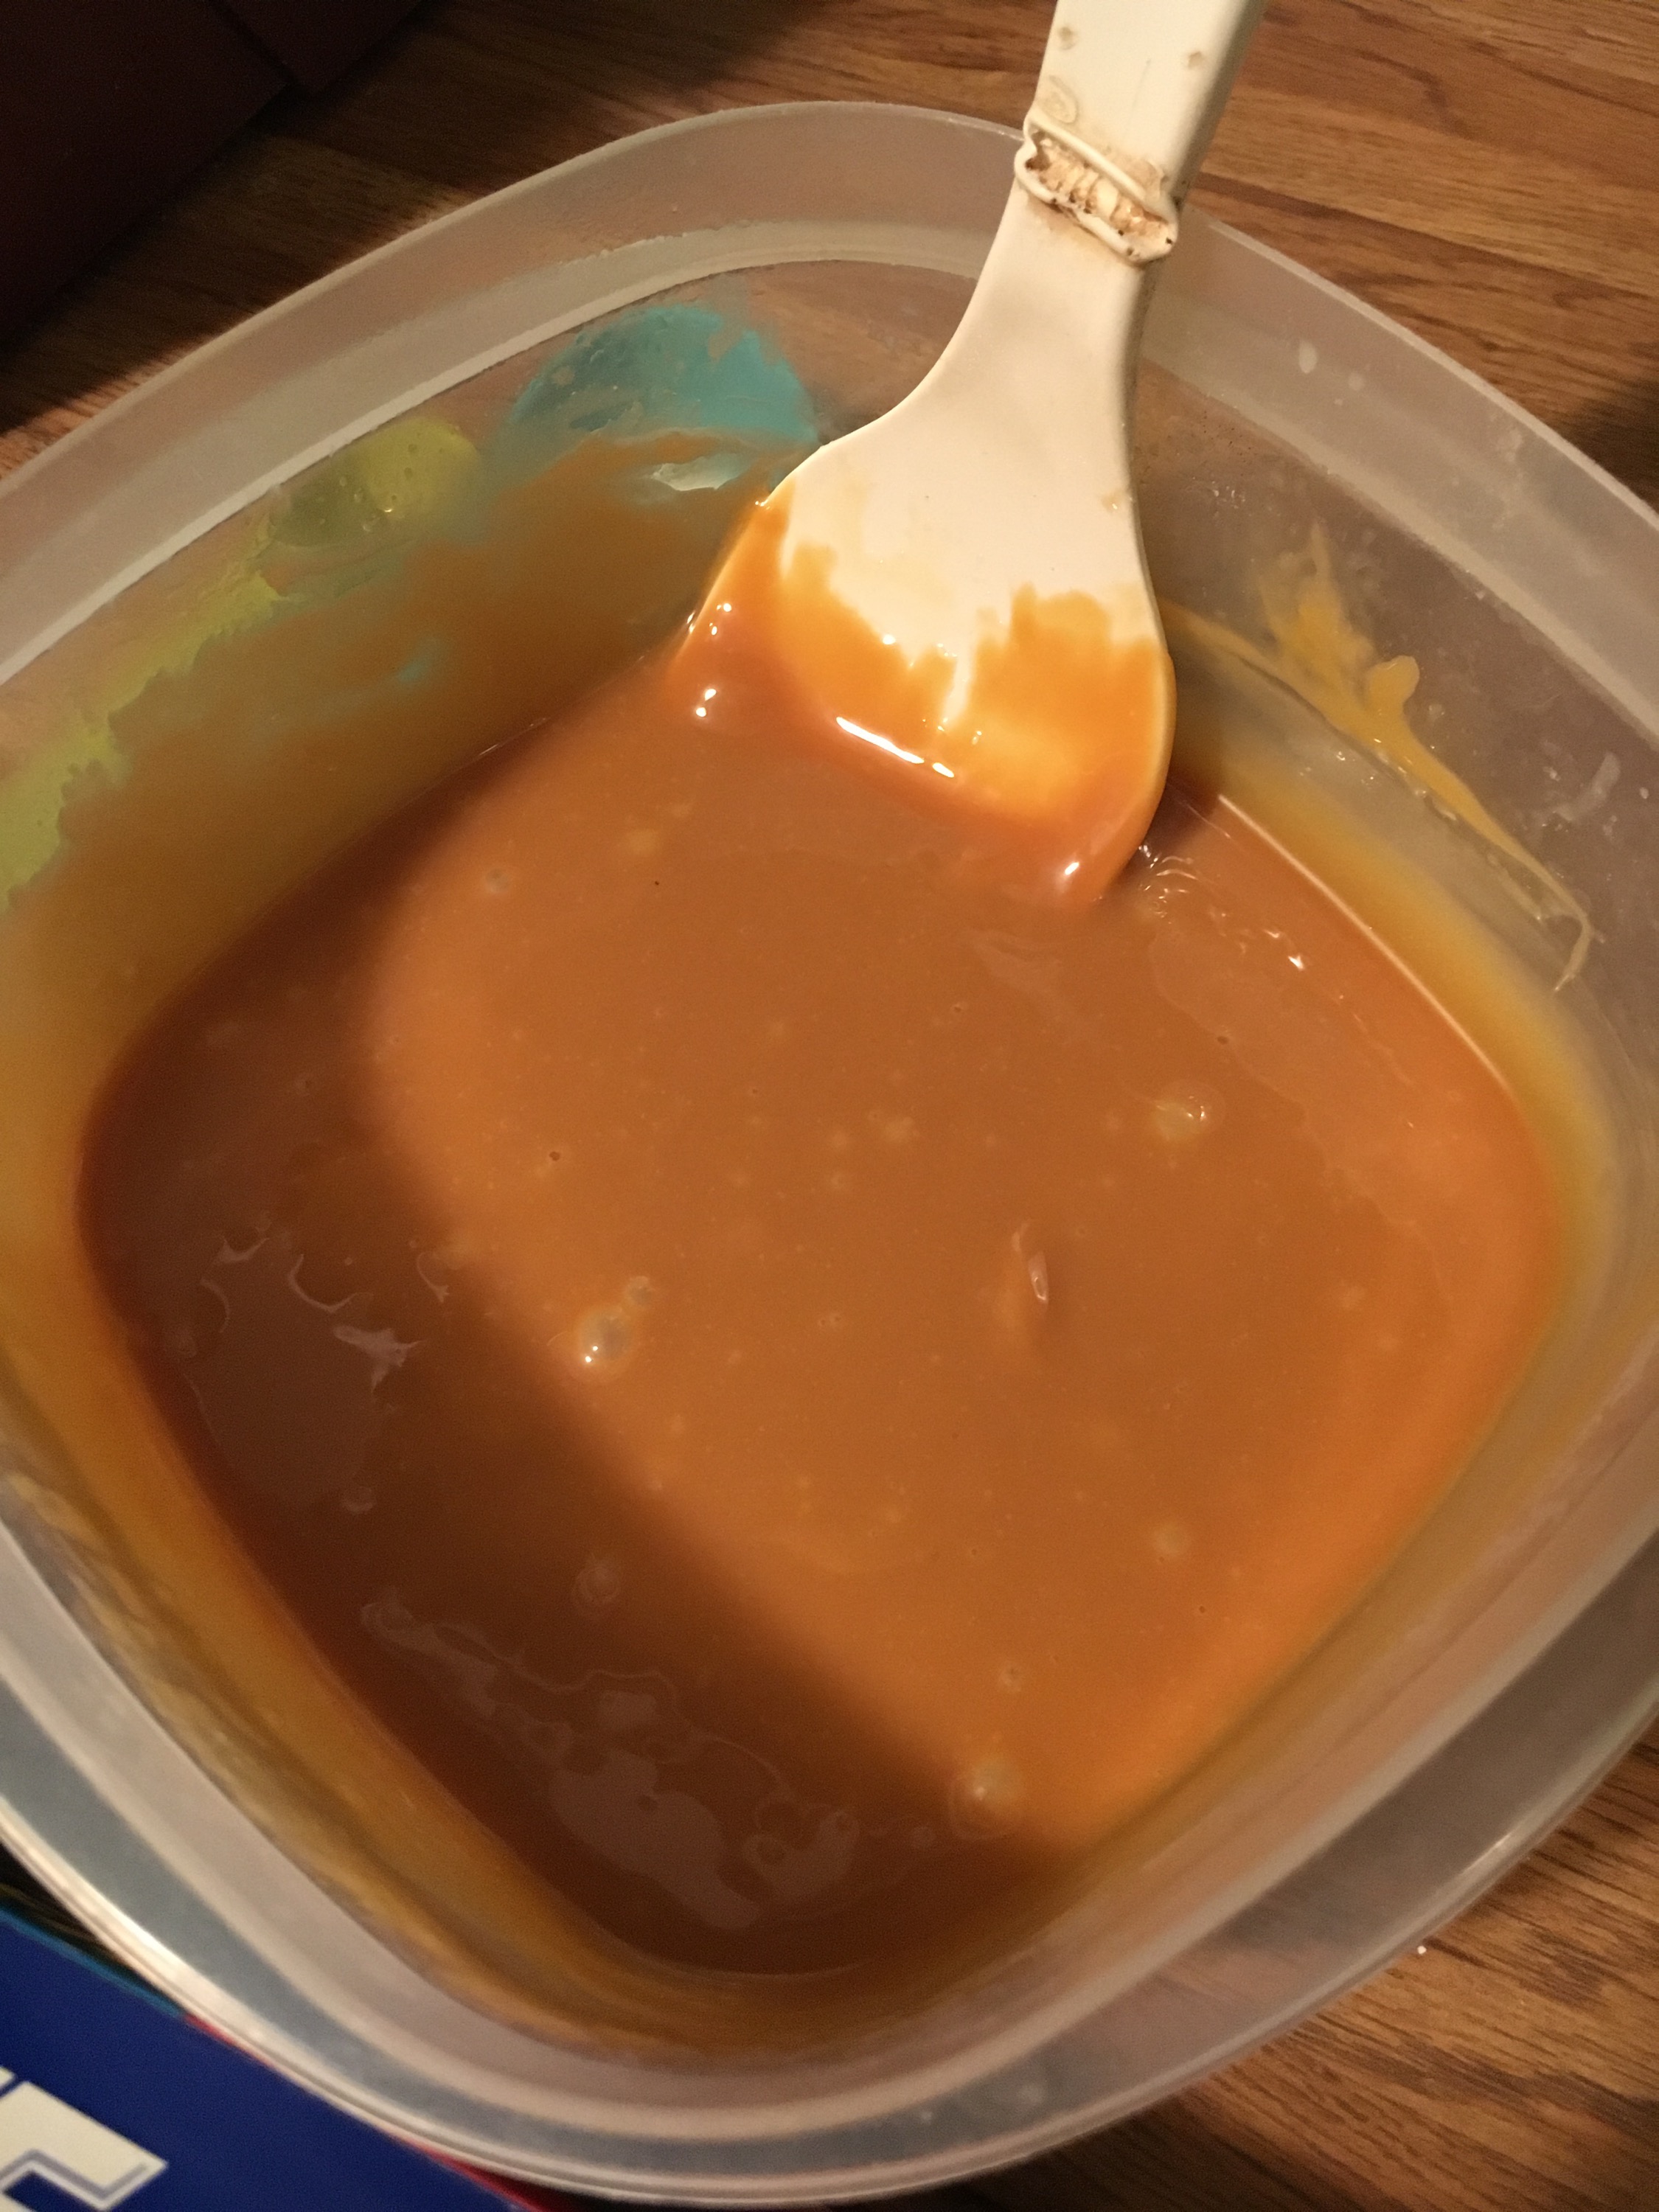
 While your fudge is mixing, combine the caramels and heavy cream in a microwave-safe bowl. Microwave in 30 second increments, stirring between, until completed melted and smooth.  

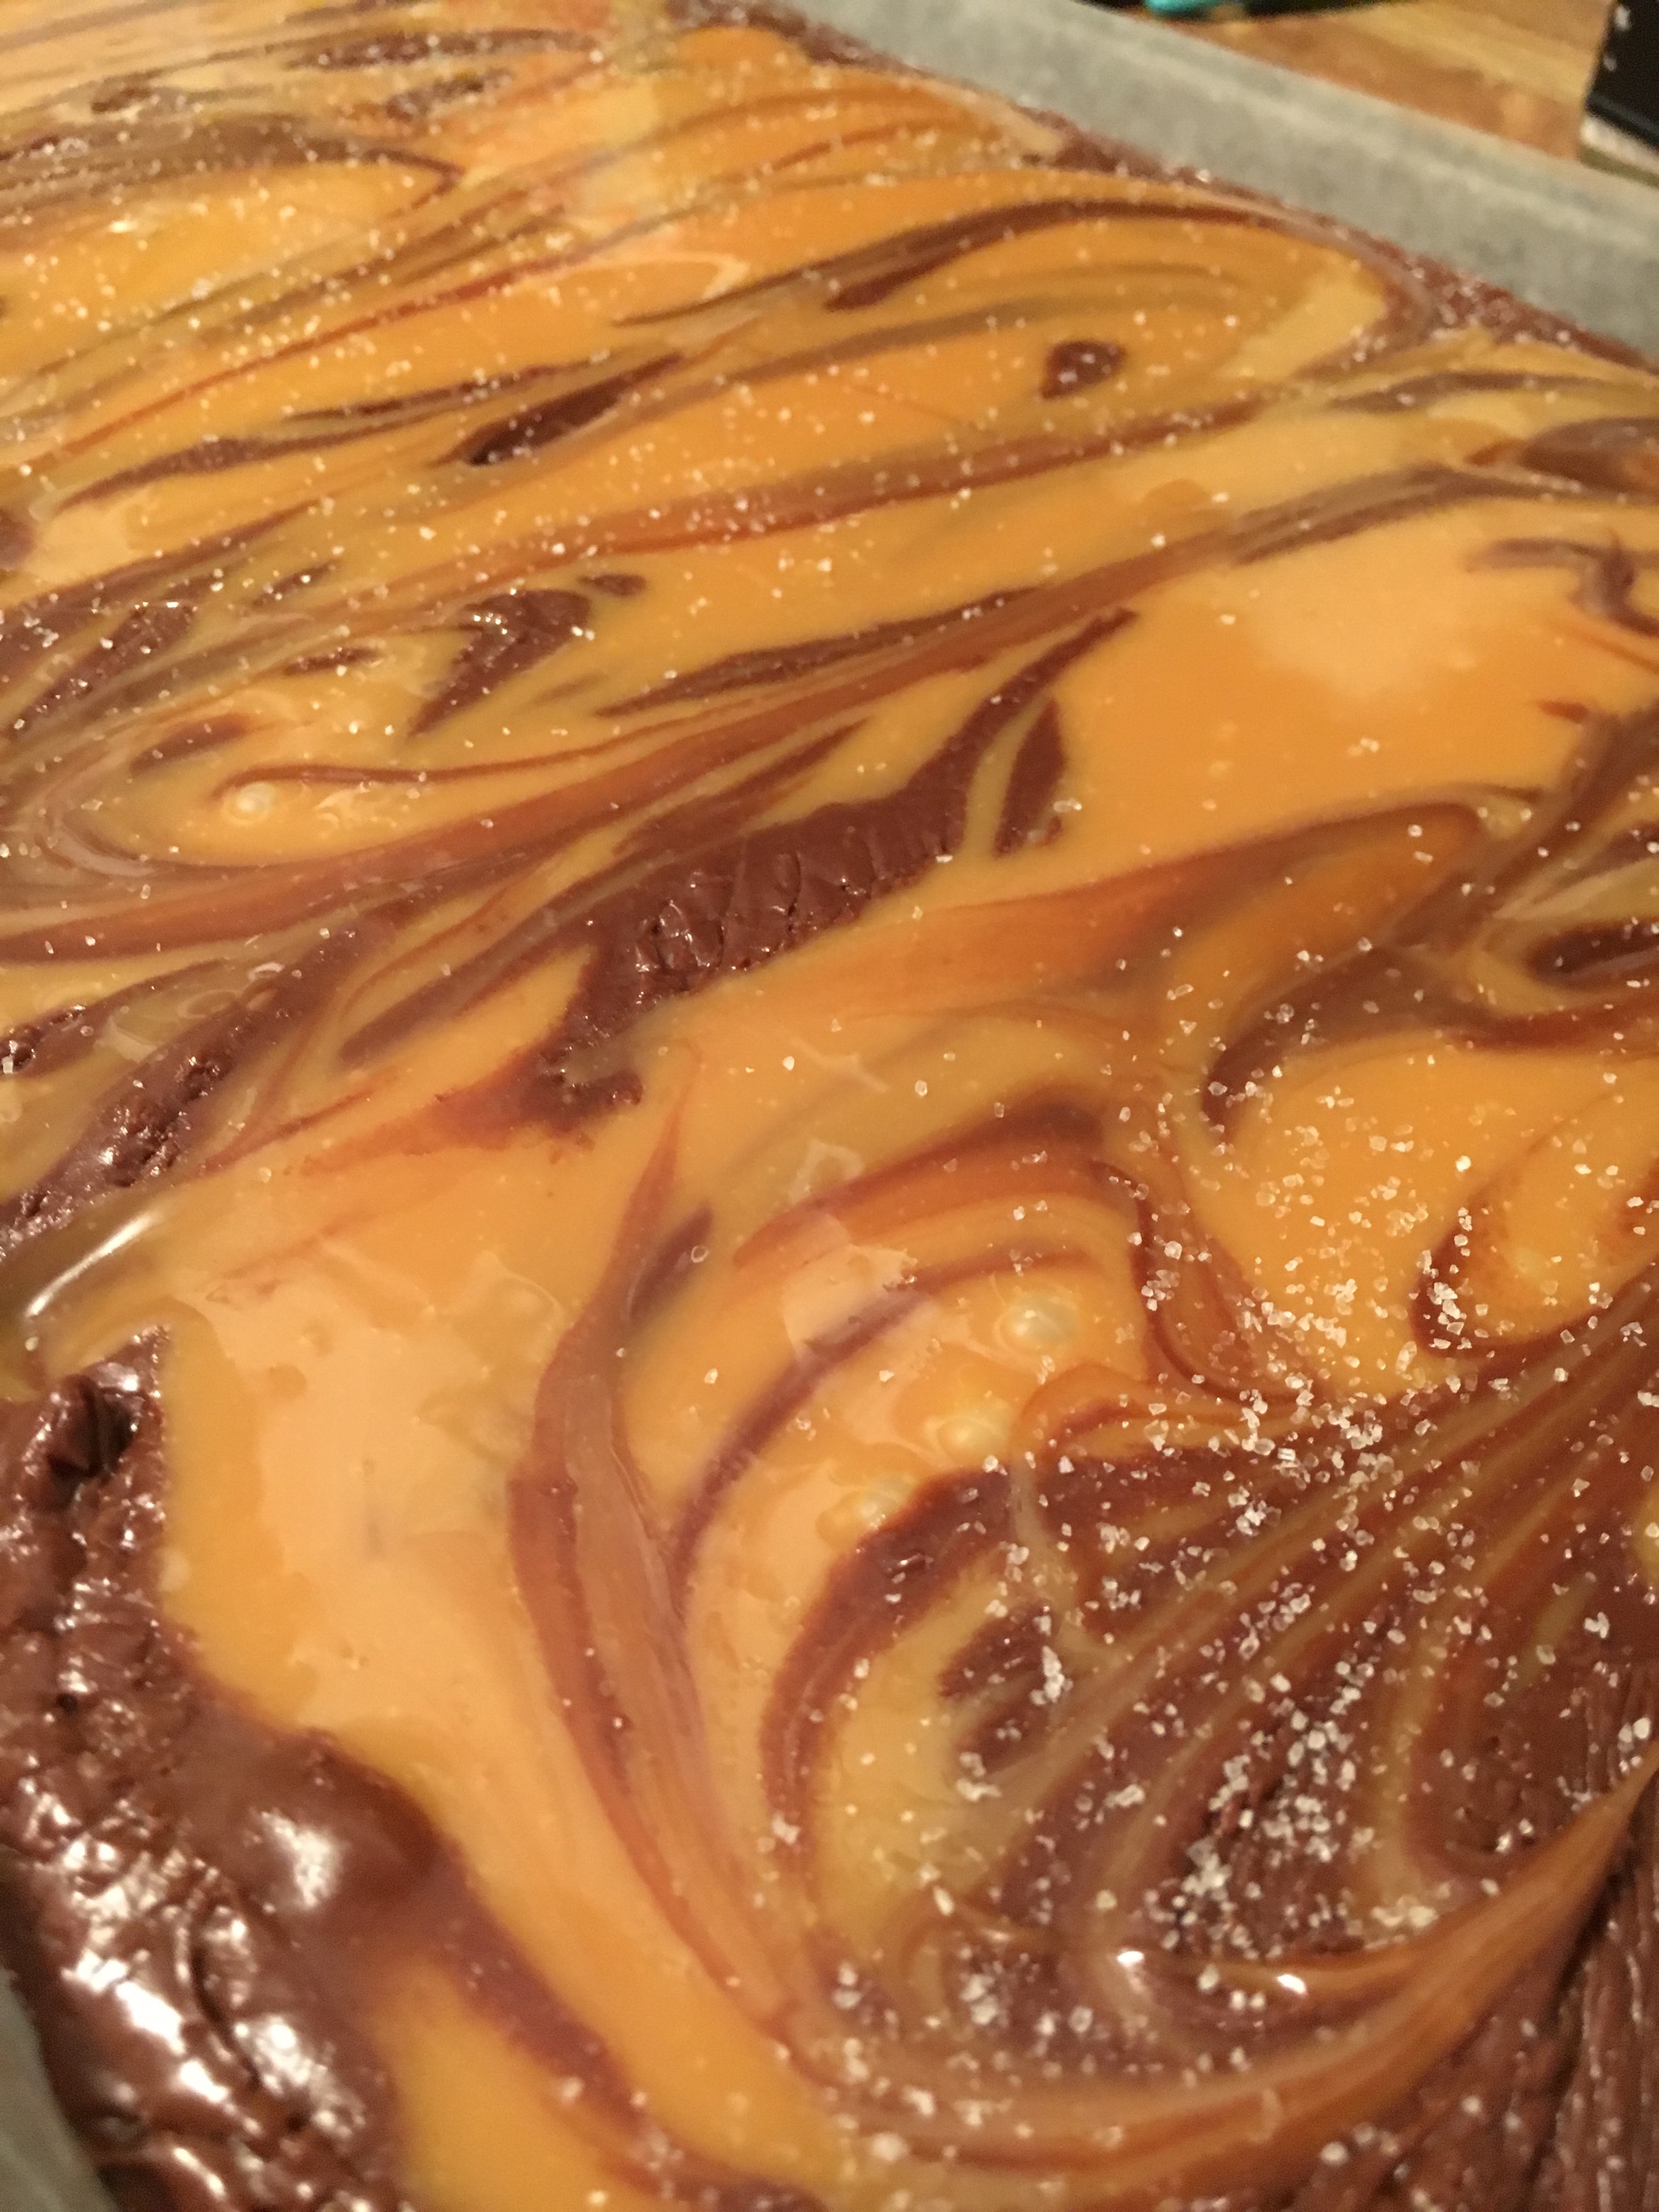
 Now, the fun stuff. 😜 Pour that big ol’ bowl of chocolate into the pan, spreading evenly. Then take the caramel and drizzle over the top…  

 And swirl into the chocolate with the top of a knife.  

 Then sprinkle with sea salt. Oooooh, mama.  

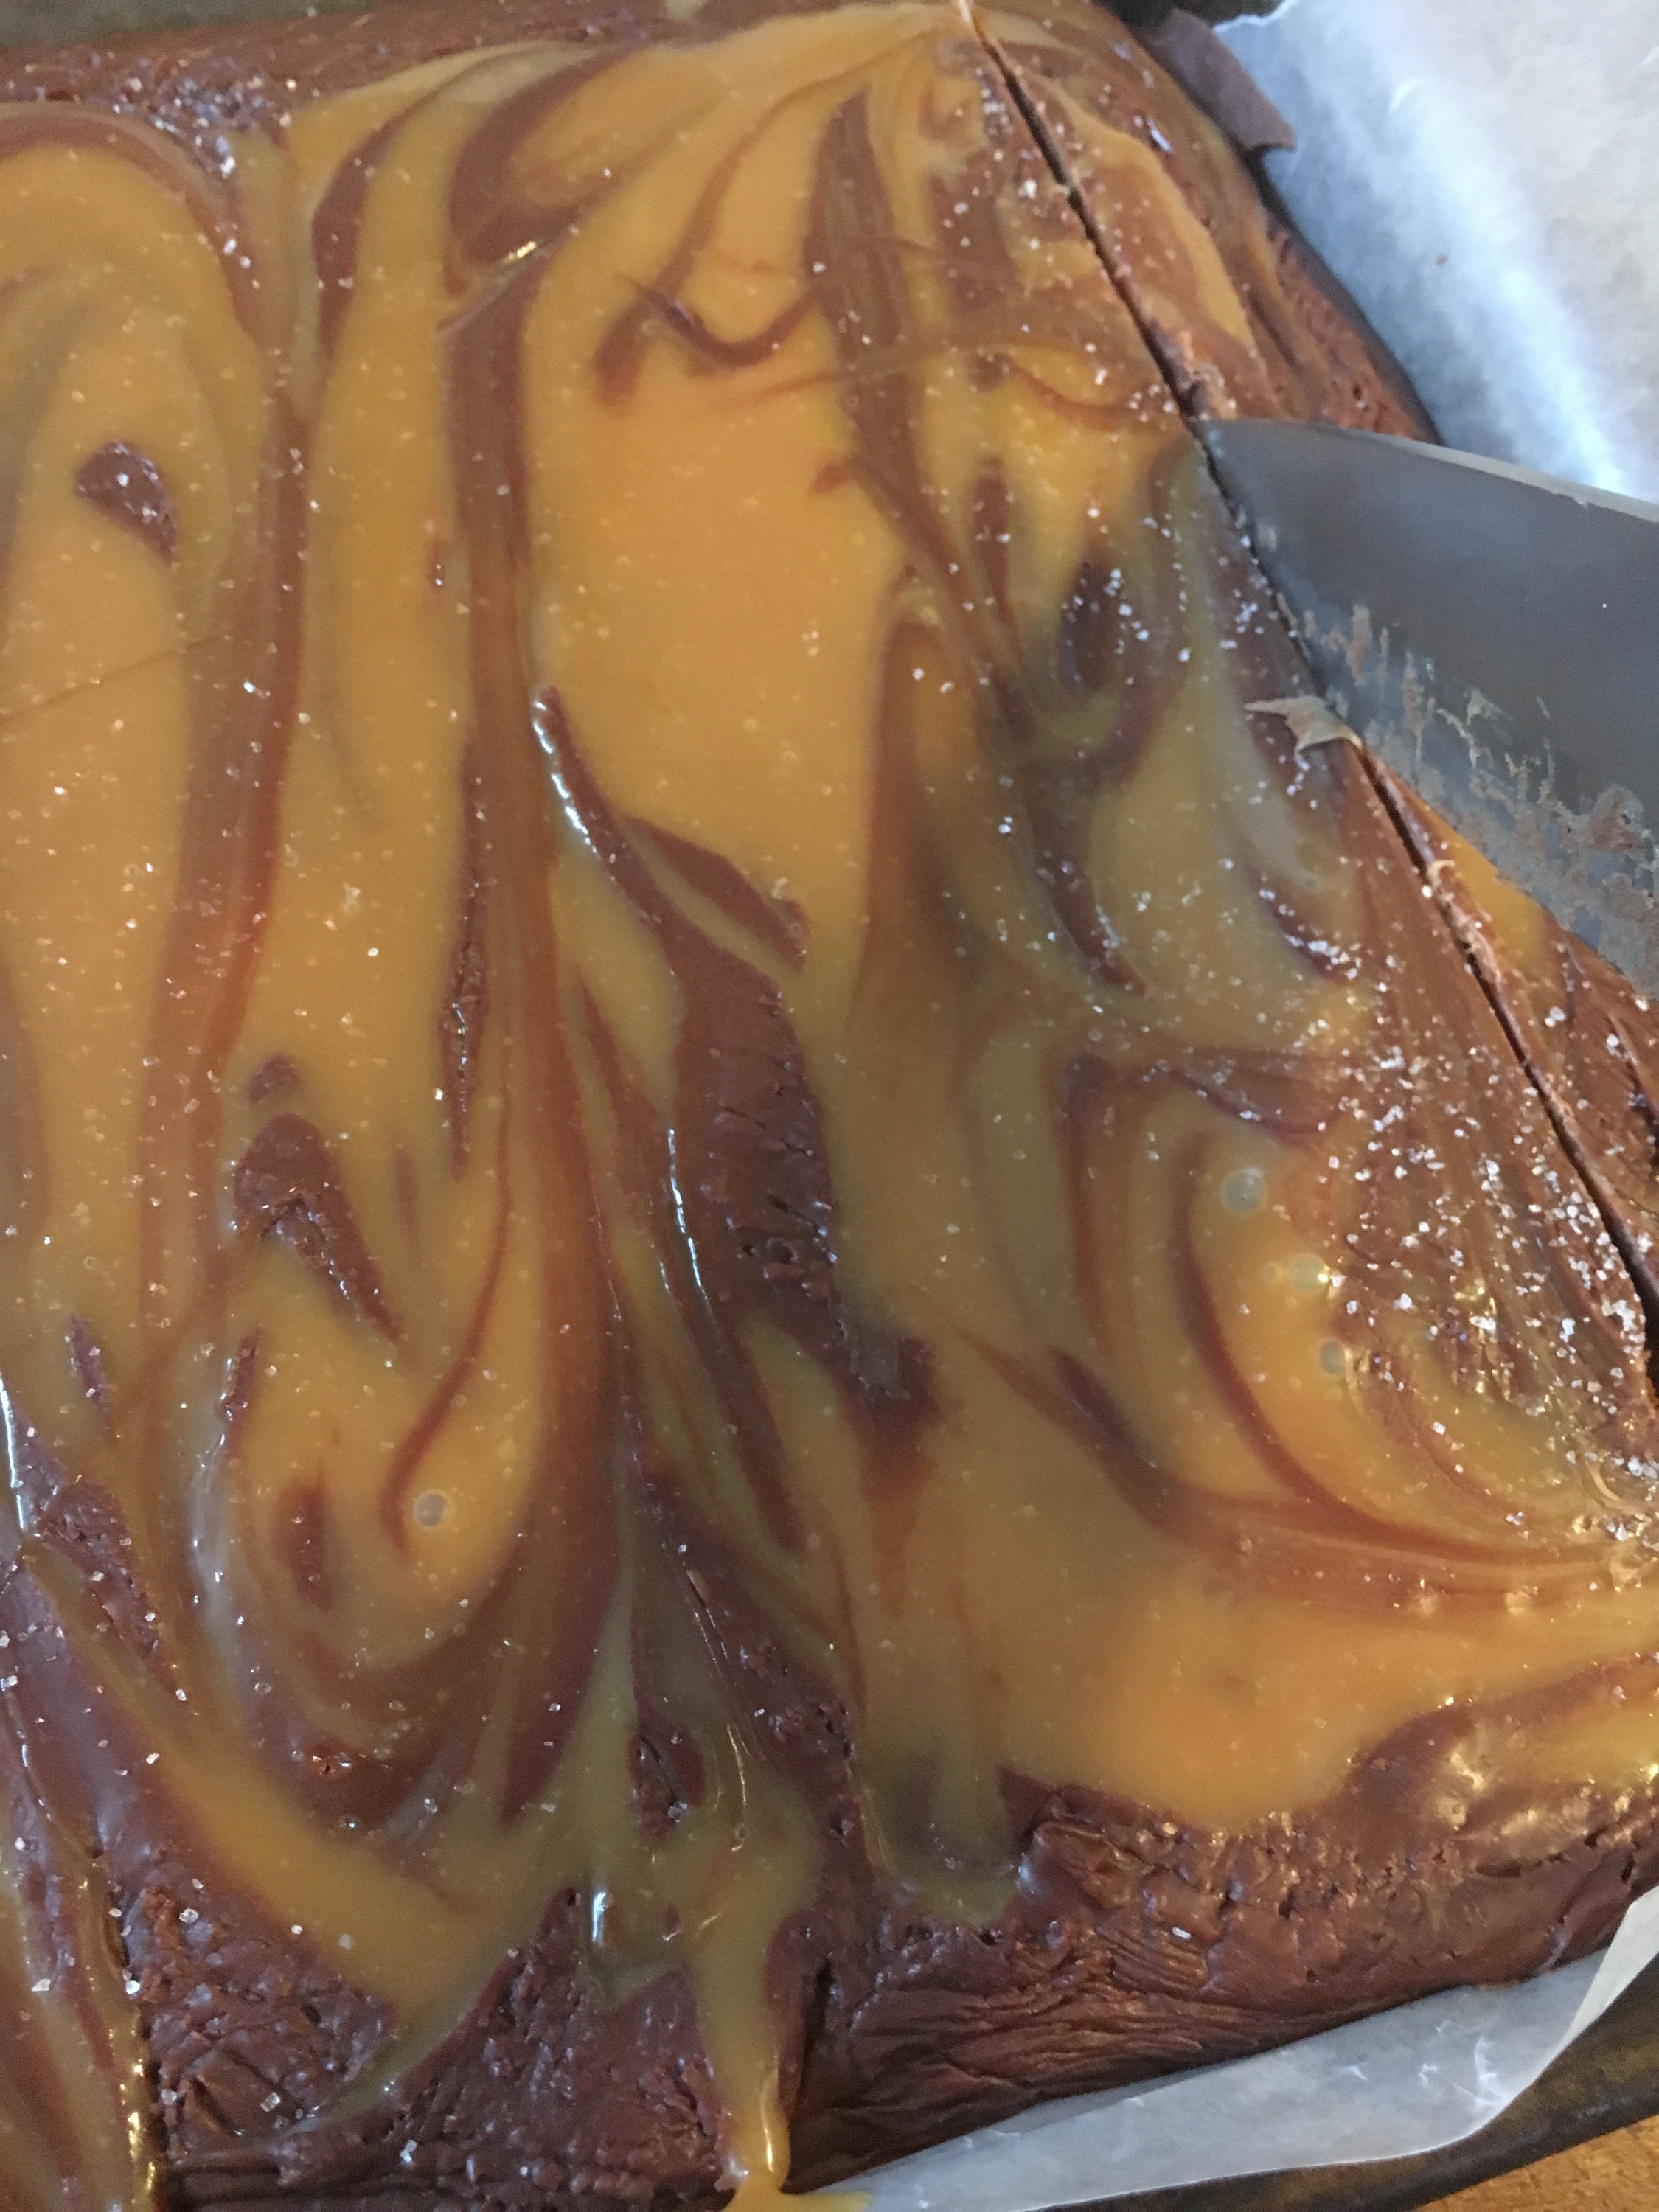
 Resist the urge to eat spoonfuls of this piping hot tray of deliciousness and refrigerate for at least 4 hours or overnight, then slice into squares. I got between 60-70ish per pan and could have gotten more… The squares honestly don’t need to be huge; this fudge is RICH. Store in an airtight container for up to 2 weeks.  


 Recipe from Shugary Sweets.

Crockpot Sausage, Green Beans & Red Potatoes

It’s December. I’m 8+ months pregnant. Needless to say, dinner has not been especially fancy fare these days! This is one of those recipes that’s just super easy… Dump everything in your crockpot and boom- 8 hours later, you have dinner with minimal effort. Plus it’s warm and yummy… Perfect for a cold day playing outside!
Ingredients:

  • 1 lb smoked sausage, kielbasa, Polish sausage (whatever you have or can find is fine!), cut into 1/4 inch rounds
  • 2 cans of green beans, drained
  • Small bag of red potatoes, cleaned and quartered
  • 1 tablespoon seasoned salt
  • 1-1.5 cups chicken broth

Directions:

Seriously, this is so easy I should be embarrassed. Toss your chopped sausage and potatoes into the pot, then add green beans. Sprinkle the seasoned salt on top.  


Pour in the chicken broth…  

 
Give it a stir, put the lid on, and set on low for 8-10 hours. Devour with some crusty bread!  Makes about 4 servings. 

 Recipe from Moms with Crockpots

THE BEST Chocolate Chip Cookies

I will preface this recipe by saying I can take zero credit for any of it. Not its creation, not purchasing the cookbook it came from… I’m not even entirely sure I found the recipe in the book. My mother in law gifted us the Better Homes & Garden’s Prizewinning Recipe book at our wedding shower over six years ago, and I’ll be honest- it didn’t get much use early on. As I’ve grown into cooking more at home (and obviously baking), I’ve found several excellent recipes in its pages. I suppose that’s why “prizewinning” is in the title, eh? 😜

Anyway, these cookies are about as perfect and classic as they come. Crunchy edges, soft and chewy center, with juuuuust the right amount of chocolate. Friends and coworkers love when I show up with these, and it’s definitely a favorite in our house when we’re craving something sweet. Plus it makes a good amount of cookies, so you’ll have dough leftover to freeze for your next chocolate chip cookie fix. Winning indeed! 

Ingredients (makes about 4 dozen cookies):

  • 3/4 cup unsalted butter, softened 
  • 1/4 cup shortening
  • 1 cup packed light brown sugar
  • 1/2 cup granulated sugar
  • 3/4 tsp baking soda 
  • 1/2 tsp salt
  • 2 eggs 
  • 1 tsp vanilla 
  • 2 1/2 cups all-purpose flour
  • 2 cups (1 package) semisweet chocolate chips

Directions:

Preheat oven to 375 degrees Fahrenheit and line 2 medium cookie sheets with parchment. In the bowl of your mixer, beat the butter and shortening on medium-high speed until combined and fluffy, about 30 seconds. Add sugars, baking soda, and salt and beat until combined, then beat in eggs and vanilla. On low speed, add flour until no dry streaks remain. Stir in chocolate chips with a rubber spatula. *Adorable, pants-less, chocolate chip stealing helper optional.  

 Drop rounded teaspoons of dough onto cookie sheets about 2 inches apart. Bake for about 8 minutes, or until edges are lightly browned. Transfer to a wire rack to cool.  

 
Recipe from Better Homes & Garden’s Prizewinning Recipes, pg. 244. 

Crockpot Chicken Taco Chili

How have I never shared this recipe until now? Since I found this on Pinterest years ago, this chili has been in heavy rotation at our house during chilly weather. First of all, it’s STUPID easy. Dump everything in the crockpot when you get up in the morning and you’re set. Second, it’s actually somewhat healthy- it’s originally a Weight Watchers recipe. Last, and most important- it’s incredibly tasty.  Put this on your menu to make on your busiest day this week! 

Ingredients:

  • 2 boneless, skinless chicken breasts (I always use frozen.. Even easier, right?! Simply subtract from your cooking time if using fresh/thawed.)
  • 1 small onion, diced
  • 2 cans diced tomatoes with green chilis, drained 
  • 1 can yellow corn, drained 
  • 1 can kidney beans, rinsed and drained
  • 1 can black beans, rinsed and drained
  • 1 (8 oz) can tomato sauce 
  • 1 packet taco seasoning
  • 1 tbsp cumin
  • 1 tbsp chili powder
  • Garnishes (sour cream, shredded cheese, cilantro, crackers, etc) optional 

Directions:

Line crockpot with disposable liner if using (seriously, those things are life changing). Add all of your ingredients to the crockpot.  

 Give it all a good stir, then set to low for 8-10 hours or high for 4-5 hours. Just before serving, shred the chicken breasts and stir until evenly mixed into chili.

 
Ladle into bowls and garnish as you please.  

 
Boom! So easy it’s almost embarrassing. Hope you enjoy as much as we do! 

Recipe from Skinnytaste.

Pumpkin Scones

Totally embracing my basic side here and fully admitting my obsession with all things pumpkin. In the past couple of weeks alone, I’ve made pumpkin cream cheese muffins, pumpkin snickerdoodles, pumpkin spice syrup, and, mostly recently- these breakfast delights. This is the most moist, flavorful scone recipe I think I’ve ever encountered, and it doesn’t even require the typical cup of heavy cream for the dough. Definitely a bit more fancy than my standard scone recipe as well- I mean, there are TWO glazes involved. A little more time consuming as well, but I promise you… Totally worth it!

Ingredients:

For the scones:

  • 2 1/4 cups all-purpose flour
  • 2 tsp baking powder
  • 1/4 tsp baking soda
  • 1/2 tsp salt
  • 1 tsp ground cinnamon
  • 1/2 tsp ground nutmeg
  • 1/4 tsp ground ginger
  • 1/8 tsp ground cloves
  • 1/4 cup packed light-brown sugar
  • 3 tbsp granulated sugar
  • 1/2 cup unsalted butter, cold and diced into 1/2-inch pieces
  • 1/2 cup + 1 tbsp canned pumpkin puree, chilled (don’t chill in can)
  • 3 1/2 tbsp buttermilk
  • 1 large egg
  • 1 tsp vanilla extract
  • 1 tbsp honey
  • 1 tbsp half and half

For the glaze:

  • 1 cup powdered sugar
  • 2 tbsp half and half, then more as needed

For the pumpkin icing:

  • 3/4 cup powdered sugar
  • 1 tbsp pumpkin puree
  • 1/4 tsp ground cinnamon
  • 1/8 tsp ground nutmeg
  • 1/8 tsp ground ginger
  • 1 tbsp half and half

Directions:

Preheat your oven to 425 degrees Fahrenheit and line a large baking sheet with parchment. In the bowl of your food processor, briefly whisk together the flour, baking powder, baking soda, salt, connamon, nutmeg, ginger, cloves, brown sugar and granulated sugar until just combined. Add butter and pulse a few times to cut the butter into the mixture (alternately, whisk the previous ingredients together in a large bowl and cut butter in with a pastry cutter). Move mixture to a large bowl and make a small well in the center.  


In a small bowl, whisk together the pumpkin purée, buttermilk, egg, vanilla, honey, and half and half.  

 
Add the wet ingredients to the dry and stir together a few times with a wooden spoon…

 
Then knead in the bowl a few times with clean, well-floured hands. Move dough to a well floured work surface and work into about an 8 inch round.  

 
Hey, art has never been my strong suit, guys. It ain’t pretty, but it’ll work. 

Use a sharp knife (you may have to flour the edge some- this dough is sticky!) and cut into 8 triangles. Transfer to your prepared baking sheet and brush the tops with some half and half…  

 
Then pop ’em in the oven for 11-14 minutes, until lightly golden and a toothpick inserted comes out clean. Put some wax paper or paper towel under a wire rack and transfer to the rack to cool. 

While the scones are cooling, whip up your glaze. In a small bowl, whisk together the powdered sugar and half and half until just thin enough to spread (it should still be pretty thick). Spoon into cooled scones (use all of it!) and spread evenly along top.  

 
In the same bowl as the plain glaze, whisk together all of the ingredients for the pumpkin glaze (this will be much thinner consistency). Transfer to a pastry bag, snip the corner off, and drizzle over the tops of the scones.  

 
Allow icings to set before serving, preferably with a hot cup of coffee. Best served day of, but we still found them quite tasty after storing for a day in an airtight container. Enjoy this lovely taste of fall, readers! 😊🍁🍂  

 Recipe from Cooking Classy.

Apple Harvest Salad

The air is getting a bit crisp around here, and our tendency to gravitate toward heartier fare isn’t far behind. This is a great lunch or dinner option when you want to fill up but don’t necessarily want to feel like you’re indulging in some unnecessary calories. 😉 I just love the crunch of the apples alongside the tenderness of the chicken in this salad, plus it’s packed with add ins to keep your tummy happy but not stuffed. I even really enjoy the dressing and I’m not a fan of balsamic vinegar on a normal basis! It’s also just a really beautiful dish full of fall colors and flavors… Can’t beat it. Give this a try next time you need a quick, satisfying meal. 

Ingredients:

  • 1 boneless, skinless chicken breast
  • 3 cups salad greens of your choice
  • 1/2 cup quinoa, rinsed, drained, and cooked 
  • 1-2 medium apples, cut into chunks 
  • 1 tbsp pepitas or sunflower seed kernels (whichever you have on hand) 
  • 1/4 cup walnuts, chopped 
  • Sprinkle of crumbled goat cheese 
  • Salt 
  • Pepper
  • Herbs de Provence 

For the dressing:

  • 1 tsp shallot, minced
  • 2 tbsp balsamic vinegar 
  • 3 tbsp extra virgin olive oil
  • Pinch of salt and black pepper

Directions:

Season your chicken breast with the salt, pepper, and Herbs de Provence. Inhale those herbs, because mmmmm…  


Then dice into cubes. Add a splash of olive oil and a pat of butter to a medium skillet over medium-high heat, then add chicken to the pan. Cook until well-browned, then remove to a plate and set aside to cool slightly. 

While your chicken is cooking, rinse your lettuce and chop your shallot, apples, and walnuts. Now would also be a good time to throw your quinoa in the microwave (according to package directions) if you haven’t cooked it already.  


Be on the lookout for small children swiping your produce mid-prep… Cute little stinker.  

 
Combine dressing ingredients in a squirt bottle and shake well. Add greens to salad bowl or individual plates, then top with quinoa, apples, chicken, nuts, and cheese. Top with a spray of dressing and enjoy!  

 
Adapted slightly from Life Made Simple.

Once a Month Breakfast Burritos

Some mornings, I just can’t. Even. Especially since becoming preggo with kiddo #2, the sheer exertion of getting out of bed is enough to wipe me out. The last thing I feel like doing is making breakfast, and even less so without coffee on board first (c’mon baby girl, you’re killin me with that one!). Enter- these breakfast delights. All it takes is 20 minutes one afternoon, and you’ve got breakfast for the next 10-20 days depending on how many you eat. Heck, double the batch and you’re really set for the month. Y’all know that a) I love anything I can make ahead and b) I love dishes that are customizable. I hope you try these and love them too! 

Ingredients:

*The eggs, cheese, and tortillas are the only items needed for the base. Anything else listed is what I had on hand and chose to use… You can use whatever strikes your fancy!

  • 12 large eggs 
  • 2 cups shredded cheese (again, your choice- I used Colby Jack this time) 
  • 20 (6) inch sized tortillas
  • 1 lb breakfast sausage crumbles
  • 1 medium onion, diced
  • 1/4 cup jalapeños, diced

Directions: 

Begin by cooking and draining the sausage.  


In another large skillet over medium heat, scramble the eggs and whatever veggies you might be using. Cool as much liquid out as you can so when reheated, your tortillas don’t get mushy!  

 
Once your eggs/veggies are thoroughly cooked, add the drained sausage and all that cheesy deliciousness to the skillet and mix until combined and the cheese is all melted.  

 
Warm your tortillas with a damp paper towel in the microwave for about 20-30 seconds, or until pliable. Scoop some filling (about 1/3 cup) into a tortilla…

 
Roll, and repeat. Place seam side down on a foil or wax paper covered baking sheet, then transfer to the freezer to freeze for about 30 minutes.  Once stiff, transfer to Tupperware or large freezer bags and freeze until ready to use.

 
To heat and eat your burritos, you can either microwave or bake them. To microwave, simply wrap a burrito in a paper towel and microwave until heated through, or about 2 minutes. To bake, first thaw desired number of burritos, then bake at 350 for about 10 minutes. Serve with salsa if you wish. That’s it! 😃 Happy breaking-the-fast!  

 Recipe adapted from Food.com.

*The original recipe calls for adding the salsa to the original mixture; I have found the mixture too damp and therefore the tortillas too mushy upon reheating. Try at your own risk!

PB & J Cupcakes

PB&J. Was there ever a more classic combination? My weird, picky childhood self was never fond of the flavor of jelly and I’ve yet to grow into it. However, these were a big hit with the mister and my coworkers! A fluffy, crumbly peanut butter cake gets a jelly filling, then topped with airy whipped peanut butter frosting and another dollop of jelly in the middle. Are you drooling yet? These bad boys are RICH so make sure you’ve got a tall, cold glass of milk to go with one of these treats. 😊

Ingredients:

For the cupcakes:

  • 1¾ cups all-purpose flour
  • ¾ tsp. baking powder
  • ¼ tsp. baking soda
  • ½ tsp. salt
  • 12 tbsp. (1½ sticks) unsalted butter, room temperature
  • 1 1/3 cups sugar
  • 2/3 cup creamy peanut butter
  • 3 large eggs
  • ½ cup sour cream or plain yogurt
  • 1 tsp. vanilla extract
  • ¼ cup buttermilk

For the filling and topping:

  • Grape and/or strawberry jam

For the frosting:

  • 2 sticks unsalted butter, at room temperature
  • 2/3 cup creamy peanut butter
  • 3 cups confectioners’ sugar, sifted
  • Pinch of coarse salt
  • 1½ tsp. vanilla extract
  • 2 tbsp. heavy cream

Directions:

Begin by preheating the oven to 350 degrees Fahrenheit and lining cupcake pans with paper liners. Combine the flour, baking powder, baking soda, and salt in a medium bowl and whisk to blend. In the bowl of your stand  mixer, combine the butter and sugar and beat on medium-high speed until light and fluffy. Blend in the peanut butter. Beat in the eggs one at a time, blending well after each addition, then add the sour cream or yogurt. With the mixer on low speed, mix in half of the dry ingredients, mixing just until incorporated. Mix in the buttermilk and then the remaining dry ingredients, mixing just until no dry streaks remain.  

 Divide the batter between the prepared liners filling each about 2/3 full. Bake 18-20 minutes, rotating the pans halfway through baking. Let cool in the pans a few minutes, then transfer to a wire rack to cool completely.  

 
While your cupcakes are cooling, prepare the frosting. In a clean stand mixer bowl, beat the butter and peanut butter on medium speed until smooth. Add the confectioners sugar and salt. Reduce speed and add vanilla  and heavy cream just until combined, then whip on high speed for 3-4 minutes.  

 To fill the cupcakes, use a cupcake corer or small paring knife to cut a small cone from each cupcake. Reserve a disc from each core to cover the filling. Fill each cupcake with a small glob of grape or strawberry jam (I found it easier to use a pastry bag with a small, round tip to fill mine, but do what suits you). Replace the cake discs over the filling.  

 Finally, let’s finish these beauties! Transfer frosting to a pastry bag with a large open top. Pipe a swirl of frosting on top of each cupcake. Use the tip of a small offset spatula or a small spoon to scoop an indentation out of the center of the frosting (I used a small measuring teaspoon).  

 Fill the indentation with a small scoop of jam. Voila!  
 
Recipe from Annie’s Eats

Ahi Tuna Steaks

Ah, summertime. It’s pretty much synonymous with grilling, right? If you’re looking for something light, citrusy, tasty, and fast- look no further. The most prep you need is to remember to thaw the fish and then marinate for 30 minutes before throwing it on the grill. So simple! We love this with some couscous and veggies, so it’s a healthy option too. Can’t get much better than that!

Ingredients:

  • 4 (4) oz ahi tuna steaks 
  • 1/4 cup orange juice
  • 1/4 cup soy sauce 
  • 2 tbsp olive oil 
  • 1 tbsp lemon juice 
  • 1 clove garlic, minced 
  • 2 tbsps fresh parsley, chopped
  • 1/2 tsp fresh oregano, chopped
  • 1/2 tsp black pepper

Directions:

In a medium-large dish, combine all ingredients but tuna steaks and whisk lightly to blend. Add tuna steaks to marinade, cover and refrigerate for 30 minutes.  


Once your 30 minutes is up, heat your grill to high heat and lightly oil the grates. Take your juicy marinated tuna out of its bath…  

 
Then slap ’em on the grill for 5-6 minutes. Turn over and baste with additional marinade, cooking for another 5 minutes or so.  

 
Remove to a plate to rest a minute or two before serving! That’s it! 😎 One of my favorite simple summer recipes, full of flavor to boot. Enjoy! 

Recipe from Allrecipes.com.

Toasted Marshmallow Cookie Bars

Warming: if you AT ALL dislike getting messy while cooking/baking, this is not the recipe for you. Marshmallows get toasted and chopped up and while the process is a sticky mess, the outcome is oh-so-amazing. Finger lickin good, you might say. 😉 Try these for your next summer/fall get together, or just because it’s Tuesday. 

Ingredients:

  • 6 oz regular or jumbo marshmallows 
  • 2 cups flour
  • 1/2 tsp baking powder 
  • 1/4 tsp salt
  • 2 sticks unsalted butter, room temperature 
  • 1 cup sugar
  • 1 tbsp light brown sugar
  • 1 vanilla bean, split lengthwise 
  • 1 large egg
  • 2 tsps vanilla 

Directions:

Toast your marshmallows on all sides however you choose. I was pretty fancy- slid them on a skewer, then used my stovetop burner.  


Transfer to a baking sheet lined with parchment, and cool in refrigerator for at least 2 hours.   

Once your marshmallows have set, prepare the rest of the cookie dough! Preheat oven to 375 degrees Fahrenheit and lining an 8×8 baking pan with parchment, leaving enough to hang over the sides. In a small mixing bowl, combine the flour, baking powder, and salt; set aside. In the bowl of your stand mixer, beat together the butter, sugars, and seeds from the vanilla bean on medium-high speed until light and fluffy. Add the egg and vanilla. Turn mixer to low speed and add dry ingredients until just combined. 

Next, chop up your marshmallows as best you can. I quartered mine and that was more than enough chopping with something so sticky!  I did find dampening my knife every few chops did help. 

 
Add your chopped marshmallows to the cookie dough and mix until no large globs remain.  

 
Transfer the dough to your prepared baking dish and smooth into an even layer.  

 
If you look closely, you can see the toasty bits and vanilla seeds. Mmmmm! 😋  

 
Bake for 25-30 minutes or until the top is nicely browned. Transfer to a wire rack to cool. 

Slice into bars and devour! 

Makes 16-20 bars

Recipe from Annie’s Eats